P5
How to guide:
Modelling:
1: start with a cube then smooth the cube by selecting Mesh > Smooth and your cube should look like this. This cube will be the head of your character.

2: Now you'll have to insert the images of the character being created. Take the front and side view of the character and place them in Maya. make sure to resize the images so they are the same size as each other and place them at the edges of the base map area. These images will help us to sculpt the character.


3: press the space bar which will bring you to a view section. go to the front view section and select View: Image Plane > Import Image and import the front view of the character. Then go to the side view pane and select the same thing for that and import the side image


4: Now you will want to start extruding and shaping the block to fit the shape of the characters head. Double click the move tool and set the symmetry settings to Object X.

Do this by using the extrude tool, move tool, and the edge loop tool to help mesh the head shape.


5: Keep using the tools to help properly mould your head and begin to add more details. Use the multi cut tool to help extra edges on your characters head to help define it more


Multi cut tool:

(Extrude)

Move tool, Rotate tool and Resize tool:

6: Once you're happy with the head shape, create a more rectangular square. This is going to be the body.

7: Delete half of the rectangle and focus on shaping the other half to create on half of the jacket, creating the sleeve and hem of the jacket as well.


14. Once you have the legs completed the shoes and hands are the next step. The shoes are tricky as they are the most detailed part of the character.

first you will want to start of with a basic rectangle shape. add plenty of subdivisions to allow the rectangle to be easily edited. make sure to turn on the symmetry to subject X to get a more precise boot and to make the work time lessen.
the back of the shape you will want to extrude upwards to make an L shape, this will be that base shape for the boot.
15. start with the front of the boot and begin to extrude each face outwards slowly. Make the shape circular, this will be the front of the boot. Make sure to add more faces with the multi cut tool if you feel like the shape isn't coming out circular enough.


Select all of your character and select delete history, then freeze transformations and finally select centre pivot.


7: Delete half of the rectangle and focus on shaping the other half to create on half of the jacket, creating the sleeve and hem of the jacket as well.


8: Now you will want to mirror the part of the jacket you've made to make it whole then connect any vertices that need connecting.

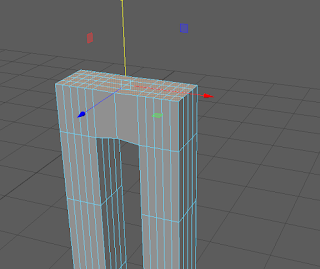
9: Next we will be making the characters legs. Firstly you will want to make a rectangle in a size that will fit the characters leg shape.

10. Make sure the shape has a height subdivision of five and a height subdivision of around 8.

Select the bottom face of the shape and shrink the sizes down slightly to make the ankle of the leg.

Now select the top of the leg and make it a bit bigger with the resize tool.

With the leg selected, press '3' to create a smoothed version of the leg, this will make the leg more round.

Select the middle three leg faces and move them forwards slightly to create a slight bend in the leg, if the leg has more subdivisions in the width, you can create more of a natural leg bend.
11. now create an edge loop near the top of the leg and extrude the inside face out slightly, then shrink the faces down slightly.

12. Now select the leg and mirror it, and move it so it connects with the other leg.

13. Select the faces at the top of the legs and move them upwards then you can join the legs to the bottom part of the body.

14. Once you have the legs completed the shoes and hands are the next step. The shoes are tricky as they are the most detailed part of the character.

first you will want to start of with a basic rectangle shape. add plenty of subdivisions to allow the rectangle to be easily edited. make sure to turn on the symmetry to subject X to get a more precise boot and to make the work time lessen.
the back of the shape you will want to extrude upwards to make an L shape, this will be that base shape for the boot.
15. start with the front of the boot and begin to extrude each face outwards slowly. Make the shape circular, this will be the front of the boot. Make sure to add more faces with the multi cut tool if you feel like the shape isn't coming out circular enough.


16. Next you shape the outside of the boot. Extrude the faces and move the edges outwards to make them more rounded and boot like.

the top of the boot should have enough subdivisions on it to make a tongue for the boot.
Select all the faces in the middle of the boot and begin to extrude them outwards. You will have to move more individual faces and rotate them to make the boot look like its curving upwards rather than going straight up.
17. Then, you will have to delete the inside holes of the boot. at the top of the L shape remove all the inside faces, making a hole that goes into the boot. this will be where the characters leg goes in.
add any remaining details to the boot you feel necessary, make sure all the vertices are connected so the boot moves well when animating.
18. For the hands you will begin with a rectangular shape and begin to mould a simple claw shape to make the character look like they're wearing mittens.

You will firstly need to make a small rectangle and give it a subdivision depth of 2.
19. Next, using the move tool, you will need to move the middle and bottom edge outwards to make the rectangle look more rounded.

This is going to be the wrist of the character.
20. next, make the two front faces smaller before extruding them two outwards, making the faces stretched out, this will be the beginning of our characters hand.


21. Now you will need to make a new small face on the edge of the right face which we will later mould into the thumb.
22. Next, take the two bigger faces at the front and extrude them outwards, once you've done that, use the scale tool to scale down the faces, making it look more like a hand.
23. Next extrude the smaller face outwards, but not as much as you did with the fingers.
Then you will have to re-extrude the face and scale it down, move it to the side to give it a more thumb like shape.

24. Lastly place the hand of your character into the sleeve of the jacket and combine them together.
Rigging:

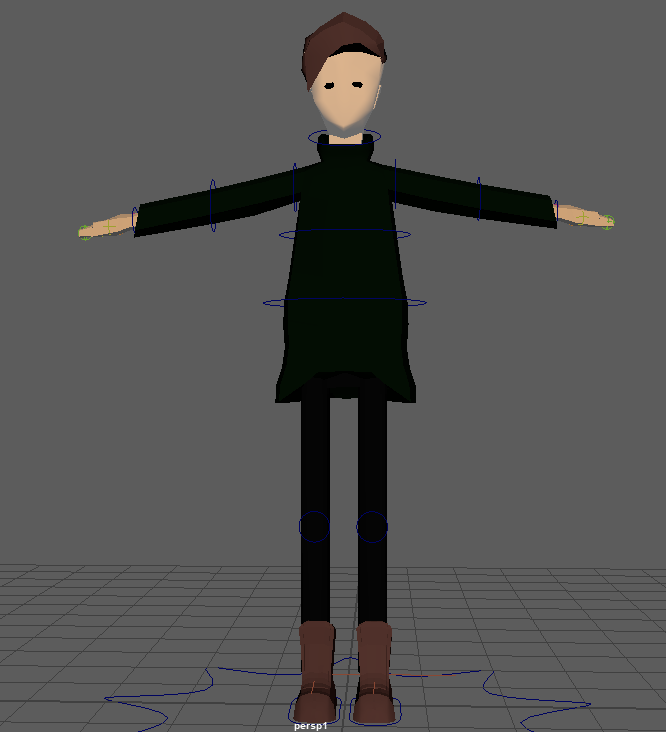
Now we have the character base, we will need to begin rigging it so we can eventually animate the character. Firstly select shading and then X-ray to make the characters opacity drop.
Firstly you will want to begin by clearing all history and freezing transformations for your character.


Select all of your character and select delete history, then freeze transformations and finally select centre pivot.
Now you will want to being making joints for your character. For this you will have to change your workspace from 'Modelling' to 'Rigging'

Next, select the joint tool and start of by making a 'root joint', this joint all other joints are connected to so make sure to connect it to the right place.

You will want to place this joint in between the characters leg. Use control D to make another joint and place it above the other joint for the stomach. Do the same thing again but make a joint for the lower back. Re do these steps until you have a stomach joint, lower back joint, collar bone, neck and skull.

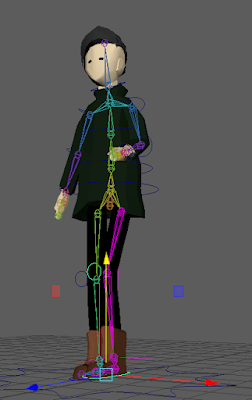
You will then want to go to your side view and make sure the joints are all positioned in the correct place.
You want the joints to look like how the skeletons would be sitting in the body, so follow the same shape pattern as the skin.

Next, open your outliner and begin to re name the joints,


You will want to place this joint in between the characters leg. Use control D to make another joint and place it above the other joint for the stomach. Do the same thing again but make a joint for the lower back. Re do these steps until you have a stomach joint, lower back joint, collar bone, neck and skull.
You will then want to go to your side view and make sure the joints are all positioned in the correct place.
You want the joints to look like how the skeletons would be sitting in the body, so follow the same shape pattern as the skin.

Next, open your outliner and begin to re name the joints,

You will want to parent your joints, parent the root and belly, the belly to the lower back, the lower back to the collarbone, etc.
Next we will be placing more joints for the arms. You will want to have no less than four joints for each arm.

Start out with the shoulder joint, then create an elbow joint then a joint for the wrist and one for the hand.
Make sure they are placed in the correct place. If you want to animate the hand as well you can then create two finger joints and a thumb joint so you can curl the characters hand together and move it.

Make sure to use your different perspectives to make sure the joints are placed in the correct place.
Then you will want to parent the finger to the hand, the hand to the wrist, the wrist to the elbow, the elbow to the shoulder and the shoulder to the collarbone.

Make sure that when you're renaming them the you specify what side of the body it is.
Next we will be making joints for the legs. We will make a joint for the leg, knee, ankle, foot and toe. And parent them.

Like the arm, make sure to use your perspectives to help when placing the joints.
And remember to specify whether its the left or right joint when naming them.


Next, create a new layer, select your model skin and add it to the layer. Once you've done this you can make the model invisible so we can focus on the joints.

Next select your root joint and select the local rotation axis.

This will make the created joints axes visible.
You will want the joints to look like this

if they don't its ok you just have to re-orient the joints and make each joint have this setting:

Once you have your joints oriented correctly, you will want to mirror the arm and leg joints.

After, make sure to parent the joints so they all connect together.
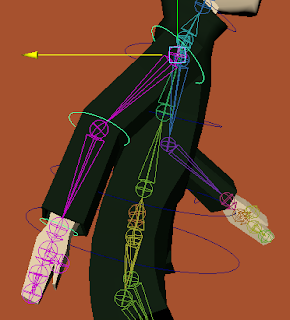
Now you have the skeleton created you need to create the IK handles, which connects the thigh to the ankle of your character to help move their legs easier.

Go to Skeleton > Create IK Handle. The select the top of your characters leg and the ankle and parent the IK to the top of the leg and ankle.

Next step is to create nurb circles. You want to create a nurb circle for each key joint of the character. You will want to snap each nurb to the joint to make sure it is placed correctly.

Once you have placed a nurb circle, you will want to delete the history and freeze the transformations.

It helps if you name the nurbs so they're easier to identify when animating. For example, I would call the nurb controlling the right foot 'Right Foot CTRL' etc.

Once you have all your nurbs, you will want to parent them to the joint. To do this you have to select the joint and then shift select the nurb then go to Constrain > Parent

Once all the nurbs have been parented create one more nurb circle at the bottom of your character, this will be the global control.

You will need to parent this nurb to the root joint of your rig.
Now select the skeleton and the character model and bind them Sink > Bind Skin

Texturing:
Select the part of the character you want to texture, for example the jacket, then right click the part you've selected and select assign new material attribute. Then select 'Lambert' then you can select a colour and the opacity of it.


Animating:
Press the animation tab at the top to bring up a timeline at the bottom of the screen. This will be what we use to keyframe the characters movements.
to make an animation, select a keyframe on the timeline then move a nurb, once you've moved your chracters nurb into the position you want the press 'S' to set the frame. You will have to set a keyframe for each nurb. once you've placed a a keyframe the character shoul.d move into the position from standing going at a certain speed depending on how far you set the keyframe from the beginning.


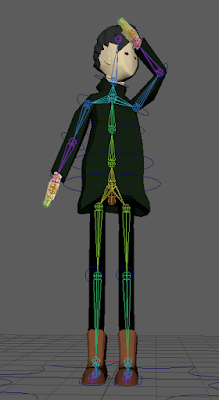
Run cycle:
Using this frame cycle I was able to make my character look and act as if he was running.
Firstly i made a keyframe of the global control NURB and set a key frame at the beginning of where my character was running from to where i wanted him to stop.


From there you want to set up your characters posture to match that of the run cycle reference. And Keyframe each NURB as you go along - make sure to space out the movements or the character will look like he is running faster than he is moving which will make it look bad.

(Left foot keyframes)


It's also important to move the characters waist and arms during this process, to make the character run more believably. rotating the waste forwards slightly makes the character look like he's putting in effort to his run, and make sure the arms move so they match the rest of the body.


Comments
Post a Comment